私有消息 - 第一部分
¥Private messaging - Part I
在本指南中,我们将创建以下应用:
¥In this guide we will create the following application:
我们将讨论以下主题:
¥We will cover the following topics:
缩放至 多个 Socket.IO 服务器
¥scaling to multiple Socket.IO servers
先决条件:
¥Prerequisites:
Socket.IO 基础知识
¥basic knowledge of Socket.IO
Vue.js 的基本知识(尽管另一个流行的前端框架的知识也应该有效)
¥basic knowledge of Vue.js (though knowledge of another popular frontend framework should work too)
Redis 基础知识(最后部分)
¥basic knowledge of Redis (for the final part)
本指南分为四个不同的部分:
¥This guide has four distinct parts:
第一部分(当前):初步实现
¥Part I (current): initial implementation
第二部分:持久用户 ID
¥Part II: persistent user ID
第三部分:持久消息
¥Part III: persistent messages
第四部分:扩大
¥Part IV: scaling up
开始吧!
¥Let's start!
安装
¥Installation
首先,让我们检索聊天应用的初始实现:
¥First, let's retrieve the initial implementation of our chat application:
git clone https://github.com/socketio/socket.io.git
cd socket.io/examples/private-messaging
git checkout examples/private-messaging-part-1
你应该在当前目录中看到以下内容:
¥Here's what you should see in the current directory:
├── babel.config.js
├── package.json
├── public
│   ├── favicon.ico
│   ├── fonts
│   │   └── Lato-Regular.ttf
│   └── index.html
├── README.md
├── server
│   ├── index.js
│   ├── package.json
└── src
    ├── App.vue
    ├── components
    │   ├── Chat.vue
    │   ├── MessagePanel.vue
    │   ├── SelectUsername.vue
    │   ├── StatusIcon.vue
    │   └── User.vue
    ├── main.js
    └── socket.js
前端的代码位于 src 目录中,而服务器的代码位于 server 目录中。
¥The code for the frontend is located in the src directory, while the code for the server is in the server directory.
运行前端
¥Running the frontend
该项目是一个使用 @vue/cli 创建的基本 Vue.js 应用。
¥The project is a basic Vue.js application which was created with @vue/cli.
运行它:
¥To run it:
npm install
npm run serve
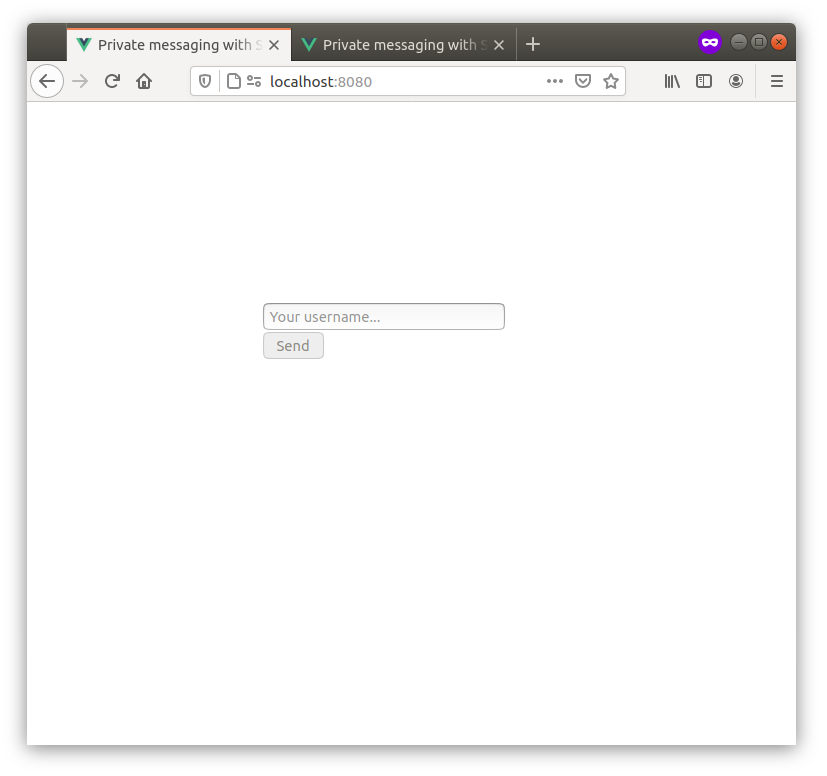
然后,如果你在浏览器中打开 http://localhost:8080,你应该看到:
¥Then if you open http://localhost:8080 in your browser, you should see:
运行服务器
¥Running the server
现在,让我们启动服务器:
¥Now, let's start the server:
cd server
npm install
npm start
你的控制台应该打印:
¥Your console should print:
server listening at http://localhost:3000
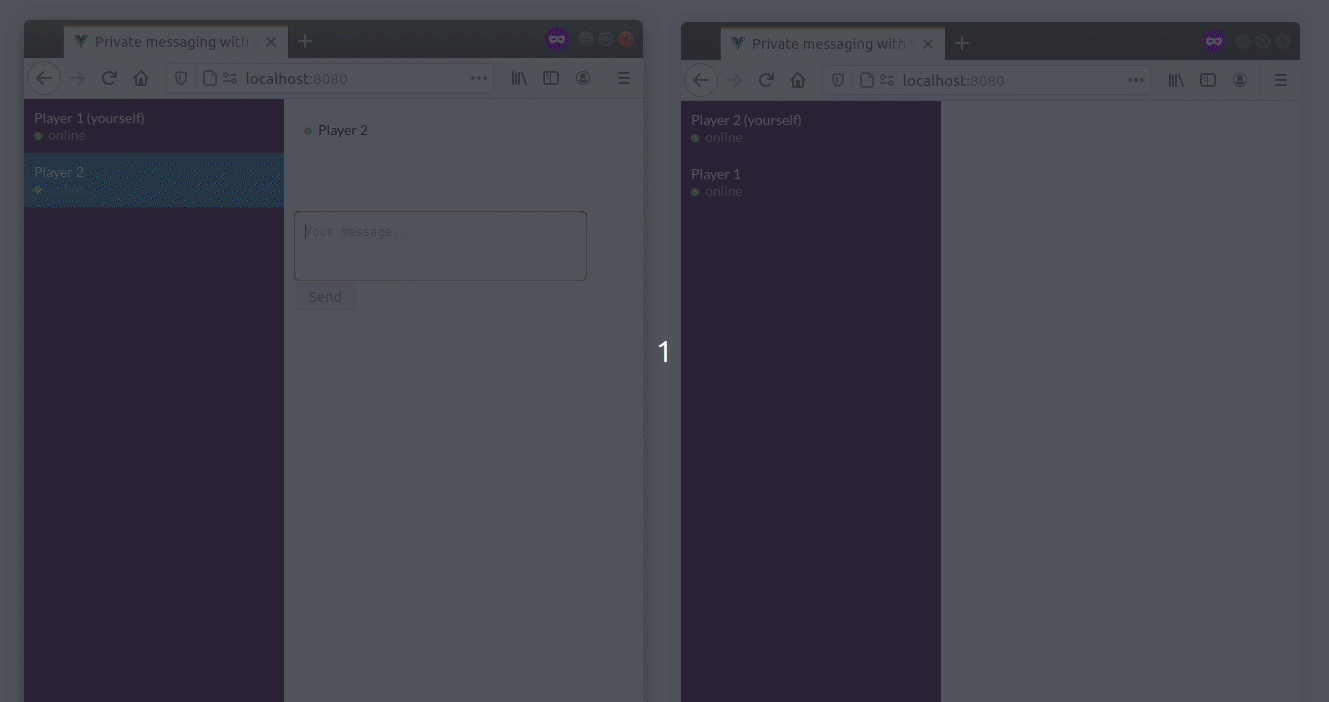
到目前为止,一切都很好!你应该能够打开多个选项卡并在它们之间发送一些消息:
¥So far, so good! You should be able to open several tabs and send a few messages between them:
工作原理
¥How it works
服务器初始化
¥Server initialization
Socket.IO 服务器在 server/index.js 文件中初始化:
¥The Socket.IO server is initialized in the server/index.js file:
const httpServer = require("http").createServer();
const io = require("socket.io")(httpServer, {
  cors: {
    origin: "http://localhost:8080",
  },
});
在这里,我们创建一个 Socket.IO 服务器并将其附加到 Node.js HTTP 服务器。
¥Here, we create a Socket.IO server and attach it to a Node.js HTTP server.
文档:
¥Documentation:
需要进行 cors 配置,以便允许前端(运行在 http://localhost:8080 上)发送的 HTTP 请求到达服务器(运行在 http://localhost:3000 上,因此我们处于跨域情况)。
¥The cors configuration is needed so that HTTP requests sent by the frontend (running at http://localhost:8080) are allowed to reach the server (running at http://localhost:3000, so we are in a cross-origin situation).
文档:
¥Documentation:
客户端初始化
¥Client initialization
Socket.IO 客户端在 src/socket.js 文件中初始化:
¥The Socket.IO client is initialized in the src/socket.js file:
import { io } from "socket.io-client";

const URL = "http://localhost:3000";
const socket = io(URL, { autoConnect: false });

export default socket;
autoConnect 设置为 false,因此不会立即建立连接。一旦用户选择了用户名,我们稍后将手动调用 socket.connect()。
¥autoConnect is set to false so the connection is not established right away. We will manually call socket.connect() later, once the user has selected a username.
¥Documentation: Socket.IO client initialization
我们还注册了一个 捕获所有监听器,在开发过程中非常有用:
¥We also register a catch-all listener, which is very useful during development:
socket.onAny((event, ...args) => {
  console.log(event, args);
});
这样客户端收到的任何事件都会打印在控制台中。
¥So that any event received by the client will be printed in the console.
用户名的选择
¥Selection of the username
现在,让我们转到 src/App.vue:
¥Now, let's move to src/App.vue:
应用启动时将 usernameAlreadySelected 设置为 false,因此显示选择用户名的表单:
¥The application is started with usernameAlreadySelected set to false, so the form to select a username is displayed:
提交表单后,我们将到达 onUsernameSelection 方法:
¥Once the form is submitted, we'll reach the onUsernameSelection method:
onUsernameSelection(username) {
  this.usernameAlreadySelected = true;
  socket.auth = { username };
  socket.connect();
}
我们将 username 附加到 auth 对象中,然后调用 socket.connect()。
¥We attach the username in the auth object, and then call socket.connect().
如果你在开发者工具中打开网络选项卡,你应该会看到一些 HTTP 请求:
¥If you open your network tab in your developer tools, you should see a few HTTP requests:
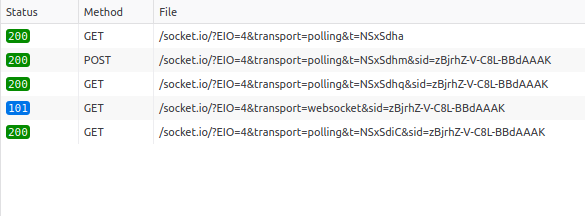
Engine.IO 握手(包含会话 ID — 此处为
zBjrh...AAAK— 用于后续请求)¥the Engine.IO handshake (contains the session ID — here,
zBjrh...AAAK— that is used in subsequent requests)Socket.IO 握手请求(包含
auth选项的值)¥the Socket.IO handshake request (contains the value of the
authoption)Socket.IO 握手响应(包含 Socket#id)
¥the Socket.IO handshake response (contains the Socket#id)
WebSocket 连接
¥the WebSocket connection
第一个 HTTP 长轮询请求,一旦 WebSocket 连接建立就关闭
¥the first HTTP long-polling request, which is closed once the WebSocket connection is established
如果看到这个,就说明连接已经成功建立了。
¥If you see this, it means that the connection was successfully established.
在服务器端,我们注册一个中间件来检查用户名并允许连接:
¥On the server-side, we register a middleware which checks the username and allows the connection:
io.use((socket, next) => {
  const username = socket.handshake.auth.username;
  if (!username) {
    return next(new Error("invalid username"));
  }
  socket.username = username;
  next();
});
username 作为 socket 对象的属性添加,以便稍后重用。你可以附加任何属性,只要不覆盖现有属性(如 socket.id 或 socket.handshake)即可。
¥The username is added as an attribute of the socket object, in order to be reused later. You can attach any attribute, as long as you don't overwrite an existing one like socket.id or socket.handshake.
文档:
¥Documentation:
在客户端(src/App.vue),我们为 connect_error 事件添加一个处理程序:
¥On the client-side (src/App.vue), we add a handler for the connect_error event:
socket.on("connect_error", (err) => {
  if (err.message === "invalid username") {
    this.usernameAlreadySelected = false;
  }
});
连接失败时将触发 connect_error 事件:
¥The connect_error event will be emitted upon connection failure:
由于底层错误(例如当服务器关闭时)
¥due to the low-level errors (when the server is down for example)
由于中间件错误
¥due to middleware errors
请注意,在上面的函数中,不会处理底层错误(例如,可以通知用户连接失败)。
¥Please note that, in the function above, the low-level errors are not handled (the user could be notified of the connection failure, for example).
最后说明:connect_error 的处理程序在 destroyed 钩子中被删除:
¥Last note: the handler for the connect_error is removed in the destroyed hook:
destroyed() {
  socket.off("connect_error");
}
因此,当组件被销毁时,我们的 App 组件注册的监听器将被清除。
¥So the listeners registered by our App component are cleaned up when the component is destroyed.
列出所有用户
¥Listing all users
连接后,我们将所有现有用户发送到客户端:
¥Upon connection, we send all existing users to the client:
io.on("connection", (socket) => {
  const users = [];
  for (let [id, socket] of io.of("/").sockets) {
    users.push({
      userID: id,
      username: socket.username,
    });
  }
  socket.emit("users", users);
  // ...
});
我们正在循环 io.of("/").sockets 对象,它是所有当前连接的 Socket 实例的 Map,由 ID 索引。
¥We are looping over the io.of("/").sockets object, which is a Map of all currently connected Socket instances, indexed by ID.
这里有两点注释:
¥Two remarks here:
我们使用
socket.id作为我们应用的用户 ID¥we are using the
socket.idas the user ID of our application我们仅检索当前 Socket.IO 服务器的用户(不适用于扩展)
¥we are only retrieving the users of the current Socket.IO server (not suitable when scaling up)
我们稍后再讨论这个问题。
¥We'll come back to this later.
在客户端(src/components/Chat.vue),我们为 users 事件注册一个处理程序:
¥On the client-side (src/components/Chat.vue), we register a handler for the users event:
socket.on("users", (users) => {
  users.forEach((user) => {
    user.self = user.userID === socket.id;
    initReactiveProperties(user);
  });
  // put the current user first, and then sort by username
  this.users = users.sort((a, b) => {
    if (a.self) return -1;
    if (b.self) return 1;
    if (a.username < b.username) return -1;
    return a.username > b.username ? 1 : 0;
  });
});
我们还通知现有用户:
¥We also notify the existing users:
服务器
¥Server
io.on("connection", (socket) => {
  // notify existing users
  socket.broadcast.emit("user connected", {
    userID: socket.id,
    username: socket.username,
  });
});
socket.broadcast.emit("user connected", ...) 将发送给所有连接的客户端,除了 socket 本身。
¥socket.broadcast.emit("user connected", ...) will emit to all connected clients, except the socket itself.
另一种广播形式 io.emit("user connected", ...) 会将 "用户已连接" 事件发送到所有连接的客户端,包括新用户。
¥The other form of broadcasting, io.emit("user connected", ...), would have sent the "user connected" event to all connected clients, including the new user.
文档:广播事件
¥Documentation: broadcasting events
客户端
¥Client
socket.on("user connected", (user) => {
  initReactiveProperties(user);
  this.users.push(user);
});
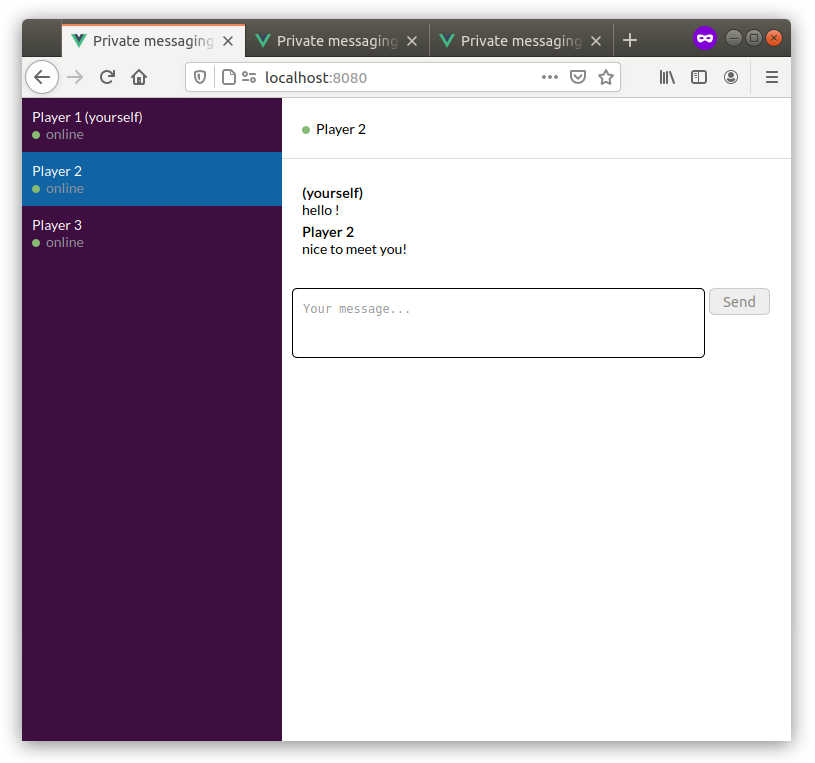
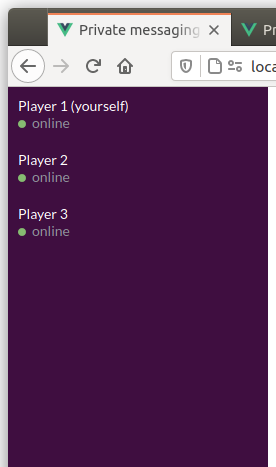
用户列表显示在左侧面板上:
¥The list of users is displayed on the left panel:
私有消息
¥Private messaging
选择给定用户时,右侧面板会显示一个聊天窗口:
¥When selecting a given user, the right panel displays a chat window:
以下是私有消息的实现方式:
¥Here is how private messages are implemented:
客户端(发送者)
¥Client (sender)
onMessage(content) {
  if (this.selectedUser) {
    socket.emit("private message", {
      content,
      to: this.selectedUser.userID,
    });
    this.selectedUser.messages.push({
      content,
      fromSelf: true,
    });
  }
}
服务器
¥Server
socket.on("private message", ({ content, to }) => {
  socket.to(to).emit("private message", {
    content,
    from: socket.id,
  });
});
这里,我们使用 房间 的概念。这些是 Socket 实例可以加入和离开的通道,并且你可以向房间中的所有客户端广播。
¥Here, we are using the concept of Rooms. These are channels that Socket instances can join and leave, and you can broadcast to all clients in a room.
我们依赖于这样一个事实:Socket 实例会自动加入由其 id 标识的房间(为你调用 socket.join(socket.id))。
¥We are relying on the fact that the Socket instance automatically joins the room identified by its id (socket.join(socket.id) is called for you).
因此 socket.to(to).emit("private message", ...) 发送给给定的用户 ID。
¥So socket.to(to).emit("private message", ...) emits to the given user ID.
客户端(接收者)
¥Client (recipient)
socket.on("private message", ({ content, from }) => {
  for (let i = 0; i < this.users.length; i++) {
    const user = this.users[i];
    if (user.userID === from) {
      user.messages.push({
        content,
        fromSelf: false,
      });
      if (user !== this.selectedUser) {
        user.hasNewMessages = true;
      }
      break;
    }
  }
});
连接状态
¥Connection status
在客户端,Socket 实例触发两个特殊事件:
¥On the client-side, the Socket instance emits two special events:
connect:连接或重新连接时¥
connect: upon connection or reconnectiondisconnect:断开连接时¥
disconnect: upon disconnection
这些事件可用于跟踪连接的状态(在 src/components/Chat.vue 中):
¥Those events can be used to track the state of the connection (in src/components/Chat.vue):
socket.on("connect", () => {
  this.users.forEach((user) => {
    if (user.self) {
      user.connected = true;
    }
  });
});

socket.on("disconnect", () => {
  this.users.forEach((user) => {
    if (user.self) {
      user.connected = false;
    }
  });
});
你可以通过停止服务器来测试它:
¥You can test it by stopping the server:

审查
¥Review
好吧,那么...我们现在所拥有的一切都很好,但有一个明显的问题:
¥OK, so... what we have for now is great, but there is an obvious issue:

解释:重新连接时会生成一个新的 Socket ID,因此每次用户断开连接并重新连接时,都会获得一个新的用户 ID。
¥Explanation: a new Socket ID is generated upon reconnection, so every time a user gets disconnected and reconnects, it will get a new user ID.
这就是为什么我们需要一个持久的用户 ID,这是本指南 第二部分 的主题。
¥That's why we need a persistent user ID, which is the subject of the 2nd part of this guide.
谢谢阅读!
¥Thanks for reading!