使用多个节点
部署多个 Socket.IO 服务器时,需要注意两件事:
¥When deploying multiple Socket.IO servers, there are two things to take care of:
如果启用了 HTTP 长轮询(这是默认设置),则启用粘性会话:参见 如下
¥enabling sticky session, if HTTP long-polling is enabled (which is the default): see below
使用兼容适配器,请参阅 此处
¥using a compatible adapter, see here
粘性负载均衡
¥Sticky load balancing
如果你计划在不同进程或计算机之间分配连接负载,则必须确保与特定会话 ID 关联的所有请求都到达发起它们的进程。
¥If you plan to distribute the load of connections among different processes or machines, you have to make sure that all requests associated with a particular session ID reach the process that originated them.
为什么需要粘性会话
¥Why is sticky-session required
这是因为 HTTP 长轮询传输在 Socket.IO 会话的生命周期内发送多个 HTTP 请求。
¥This is because the HTTP long-polling transport sends multiple HTTP requests during the lifetime of the Socket.IO session.
事实上,Socket.IO 在技术上可以在没有粘性会话的情况下工作,并具有以下同步(虚线):
¥In fact, Socket.IO could technically work without sticky sessions, with the following synchronization (in dashed lines):
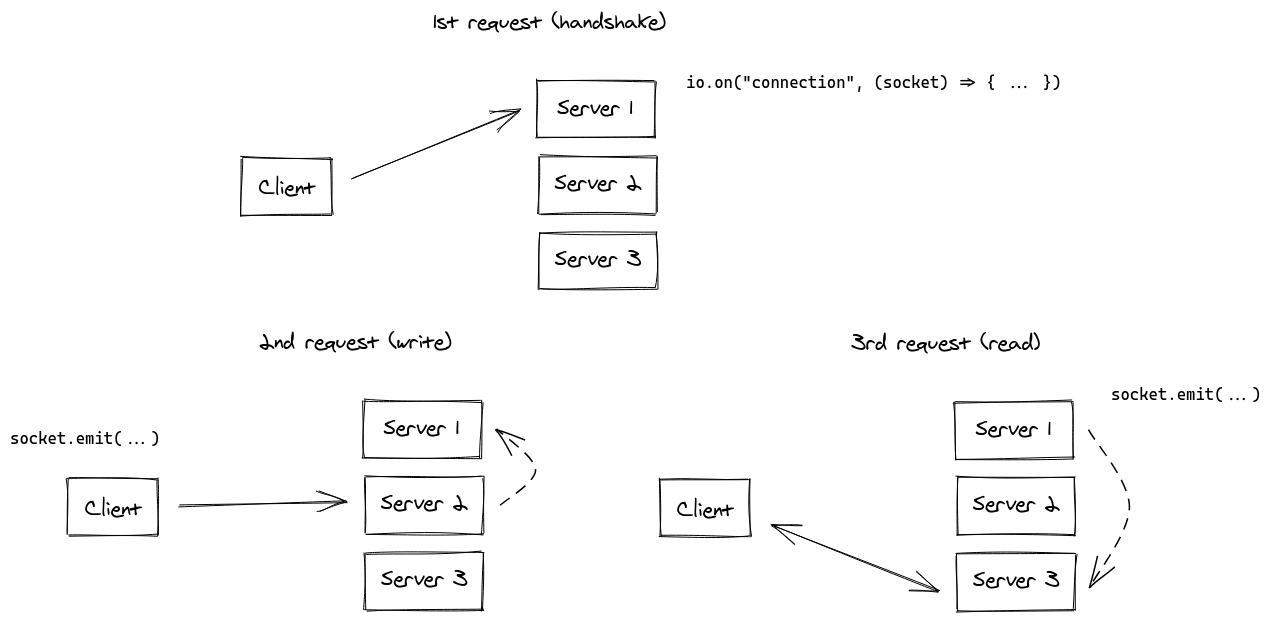
虽然显然可以实现,但我们认为 Socket.IO 服务器之间的同步过程会给你的应用带来巨大的性能损失。
¥While obviously possible to implement, we think that this synchronization process between the Socket.IO servers would result in a big performance hit for your application.
评论:
¥Remarks:
如果不启用粘性会话,你将遇到由于 "会话 ID 未知" 导致的 HTTP 400 错误
¥without enabling sticky-session, you will experience HTTP 400 errors due to "Session ID unknown"
WebSocket 传输没有此限制,因为它在整个会话中依赖于单个 TCP 连接。这意味着,如果你禁用 HTTP 长轮询传输(这在 2021 年是一个完全有效的选择),你将不需要粘性会话:
¥the WebSocket transport does not have this limitation, since it relies on a single TCP connection for the whole session. Which means that if you disable the HTTP long-polling transport (which is a perfectly valid choice in 2021), you won't need sticky sessions:
const socket = io("https://io.yourhost.com", {
  // WARNING: in that case, there is no fallback to long-polling
  transports: [ "websocket" ] // or [ "websocket", "polling" ] (the order matters)
});
文档:transports
¥Documentation: transports
启用粘性会话
¥Enabling sticky-session
要实现粘性会话,主要有两种解决方案:
¥To achieve sticky-session, there are two main solutions:
基于 cookie 路由客户端(推荐解决方案)
¥routing clients based on a cookie (recommended solution)
根据客户端的原始地址路由客户端
¥routing clients based on their originating address
你将在下面找到一些常见负载平衡解决方案的示例:
¥You will find below some examples with common load-balancing solutions:
nginx(基于 IP)
¥nginx (IP-based)
nginx 入口 (Kubernetes)(基于 IP)
¥nginx Ingress (Kubernetes) (IP-based)
Apache HTTPD(基于 cookie)
¥Apache HTTPD (cookie-based)
HAProxy(基于 cookie)
¥HAProxy (cookie-based)
Traefik(基于 cookie)
¥Traefik (cookie-based)
其他平台请参考相关文档:
¥For other platforms, please refer to the relevant documentation:
Kubernetes:https://kubernetes.github.io/ingress-nginx/examples/affinity/cookie/
AWS(应用负载均衡器):https://docs.aws.amazon.com/elasticloadbalancing/latest/application/sticky-sessions.html
¥AWS (Application Load Balancers): https://docs.aws.amazon.com/elasticloadbalancing/latest/application/sticky-sessions.html
通用控制点:https://cloud.google.com/load-balancing/docs/backend-service#session_affinity
¥GCP: https://cloud.google.com/load-balancing/docs/backend-service#session_affinity
赫鲁库:https://devcenter.heroku.com/articles/session-affinity
¥Heroku: https://devcenter.heroku.com/articles/session-affinity
重要的提示:如果你处于 CORS 情况(前端域与服务器域不同)并且会话关联性是通过 cookie 实现的,则需要允许凭据:
¥Important note: if you are in a CORS situation (the front domain is different from the server domain) and session affinity is achieved with a cookie, you need to allow credentials:
服务器
¥Server
const io = require("socket.io")(httpServer, {
  cors: {
    origin: "https://front-domain.com",
    methods: ["GET", "POST"],
    credentials: true
  }
});
客户端
¥Client
const io = require("socket.io-client");
const socket = io("https://server-domain.com", {
  withCredentials: true
});
如果没有它,浏览器将不会发送 cookie,并且你将遇到 HTTP 400 "会话 ID 未知" 响应。更多信息在 此处。
¥Without it, the cookie will not be sent by the browser and you will experience HTTP 400 "Session ID unknown" responses. More information here.
nginx 配置
¥nginx configuration
在 nginx.conf 文件的 http { } 部分中,你可以声明一个 upstream 部分,其中包含要平衡负载的 Socket.IO 进程列表:
¥Within the http { } section of your nginx.conf file, you can declare a upstream section with a list of Socket.IO process you want to balance load between:
http {
  server {
    listen 3000;
    server_name io.yourhost.com;

    location / {
      proxy_set_header X-Forwarded-For $proxy_add_x_forwarded_for;
      proxy_set_header Host $host;

      proxy_pass http://nodes;

      # enable WebSockets
      proxy_http_version 1.1;
      proxy_set_header Upgrade $http_upgrade;
      proxy_set_header Connection "upgrade";
    }
  }

  upstream nodes {
    # enable sticky session with either "hash" (uses the complete IP address)
    hash $remote_addr consistent;
    # or "ip_hash" (uses the first three octets of the client IPv4 address, or the entire IPv6 address)
    # ip_hash;
    # or "sticky" (needs commercial subscription)
    # sticky cookie srv_id expires=1h domain=.example.com path=/;

    server app01:3000;
    server app02:3000;
    server app03:3000;
  }
}
请注意 hash 指令,指示连接将是粘性的。
¥Notice the hash instruction that indicates the connections will be sticky.
确保还在最顶层配置 worker_processes 以指示 nginx 应使用多少个工作线程。你可能还想研究调整 events { } 块中的 worker_connections 设置。
¥Make sure you also configure worker_processes in the topmost level to indicate how many workers nginx should use. You might also want to look into tweaking the worker_connections setting within the events { } block.
链接:
¥Links:
nginx 的 proxy_read_timeout(默认 60 秒)的值必须大于 Socket.IO 的 pingInterval + pingTimeout(默认 45 秒),否则如果在给定的延迟后没有数据发送,nginx 将强制关闭连接,客户端将收到 "传输关闭" 错误 。
¥The value of nginx's proxy_read_timeout (60 seconds by default) must be bigger than Socket.IO's pingInterval + pingTimeout (45 seconds by default), else nginx will forcefully close the connection if no data is sent after the given delay and the client will get a "transport close" error.
nginx 入口 (Kubernetes)
¥nginx Ingress (Kubernetes)
在 Ingress 配置的 annotations 部分中,你可以根据客户端的 IP 地址声明上游哈希,以便 Ingress 控制器始终将来自给定 IP 地址的请求分配给同一个 pod:
¥Within the annotations section of your Ingress configuration, you can declare an upstream hashing based on the client's IP address, so that the Ingress controller always assigns the requests from a given IP address to the same pod:
apiVersion: networking.k8s.io/v1
kind: Ingress
metadata:
  name: your-ingress
  namespace: your-namespace
  annotations:
    nginx.ingress.kubernetes.io/configuration-snippet: |
      set $forwarded_client_ip "";
      if ($http_x_forwarded_for ~ "^([^,]+)") {
        set $forwarded_client_ip $1;
      }
      set $client_ip $remote_addr;
      if ($forwarded_client_ip != "") {
        set $client_ip $forwarded_client_ip;
      }
    nginx.ingress.kubernetes.io/upstream-hash-by: "$client_ip"
spec:
  ingressClassName: nginx
  rules:
    - host: io.yourhost.com
      http:
        paths:
          - path: /
            pathType: Prefix
            backend:
              service:
                name: your-service
                port:
                  number: 80
注意:
¥Notes:
nginx.ingress.kubernetes.io/upstream-hash-by: "$client_ip"
此注释指示 NGINX 入口控制器使用客户端的 IP 地址将传入流量路由到 Kubernetes 集群中的特定 Pod。这对于维持粘性会话至关重要。
¥This annotation instructs the NGINX Ingress Controller to use the client's IP address for routing incoming traffic to a specific Pod in your Kubernetes cluster. This is crucial for maintaining sticky sessions.
nginx.ingress.kubernetes.io/configuration-snippet
这个自定义 NGINX 配置片段有双重用途:
¥This custom NGINX configuration snippet serves a dual purpose:
如果请求通过附加
X-Forwarded-For标头的上游反向代理或 API 网关,则此代码段会从该标头中提取第一个 IP 地址并使用它来更新 $client_ip。¥If the request passes through upstream reverse proxies or API gateways that append an
X-Forwarded-Forheader, this snippet extracts the first IP address from that header and uses it to update the $client_ip.在没有此类代理或网关的情况下,该代码片段仅使用 remote_addr,它是直接连接到入口的客户端的 IP 地址。
¥In the absence of such proxies or gateways, the snippet simply uses the remote_addr, which is the IP address of the client directly connected to the ingress.
这可确保正确的客户端 IP 用于由 nginx.ingress.kubernetes.io/upstream-hash-by: "$client_ip" 注释启用的粘性会话逻辑。当你的架构包含反向代理或 API 网关等上游网络组件时,该代码段尤其重要。
¥This ensures that the correct client IP is used for the sticky session logic, enabled by the nginx.ingress.kubernetes.io/upstream-hash-by: "$client_ip" annotation. The snippet is particularly important when your architecture includes upstream network components like reverse proxies or API gateways.
链接:
¥Links:
Apache HTTPD 配置
¥Apache HTTPD configuration
Header add Set-Cookie "SERVERID=sticky.%{BALANCER_WORKER_ROUTE}e; path=/" env=BALANCER_ROUTE_CHANGED

<Proxy "balancer://nodes_polling">
    BalancerMember "http://app01:3000" route=app01
    BalancerMember "http://app02:3000" route=app02
    BalancerMember "http://app03:3000" route=app03
    ProxySet stickysession=SERVERID
</Proxy>

<Proxy "balancer://nodes_ws">
    BalancerMember "ws://app01:3000" route=app01
    BalancerMember "ws://app02:3000" route=app02
    BalancerMember "ws://app03:3000" route=app03
    ProxySet stickysession=SERVERID
</Proxy>

RewriteEngine On
RewriteCond %{HTTP:Upgrade} =websocket [NC]
RewriteRule /(.*) balancer://nodes_ws/$1 [P,L]
RewriteCond %{HTTP:Upgrade} !=websocket [NC]
RewriteRule /(.*) balancer://nodes_polling/$1 [P,L]

# must be bigger than pingInterval (25s by default) + pingTimeout (20s by default)
ProxyTimeout 60
链接:
¥Links:
HAProxy 配置
¥HAProxy configuration
# Reference: http://blog.haproxy.com/2012/11/07/websockets-load-balancing-with-haproxy/

listen chat
  bind *:80
  default_backend nodes

backend nodes
  option httpchk HEAD /health
  http-check expect status 200
  cookie io prefix indirect nocache # using the `io` cookie set upon handshake
  server app01 app01:3000 check cookie app01
  server app02 app02:3000 check cookie app02
  server app03 app03:3000 check cookie app03
链接:
¥Links:
Traefik
使用容器标签:
¥Using container labels:
# docker-compose.yml
services:
  traefik:
    image: traefik:2.4
    volumes:
      - /var/run/docker.sock:/var/run/docker.sock
    links:
      - server

  server:
    image: my-image:latest
    labels:
      - "traefik.http.routers.my-service.rule=PathPrefix(`/`)"
      - traefik.http.services.my-service.loadBalancer.sticky.cookie.name=server_id
      - traefik.http.services.my-service.loadBalancer.sticky.cookie.httpOnly=true
对于 文件提供者:
¥With the File provider:
## Dynamic configuration
http:
  services:
    my-service:
      rule: "PathPrefix(`/`)"
      loadBalancer:
        sticky:
          cookie:
            name: server_id
            httpOnly: true
链接:
¥Links:
使用 Node.js 集群
¥Using Node.js Cluster
就像 nginx 一样,Node.js 通过 cluster 模块提供内置集群支持。
¥Just like nginx, Node.js comes with built-in clustering support through the cluster module.
有多种解决方案,具体取决于你的用例:
¥There are several solutions, depending on your use case:
| NPM 包 | 工作原理 |
|---|---|
@socket.io/sticky | 路由基于 sid 查询参数 |
sticky-session | 路由基于 connection.remoteAddress |
socketio-sticky-session | 基于 x-forwarded-for 标头的路由) |
以 @socket.io/sticky 为例:
¥Example with @socket.io/sticky:
const cluster = require("cluster");
const http = require("http");
const { Server } = require("socket.io");
const numCPUs = require("os").cpus().length;
const { setupMaster, setupWorker } = require("@socket.io/sticky");
const { createAdapter, setupPrimary } = require("@socket.io/cluster-adapter");

if (cluster.isMaster) {
  console.log(`Master ${process.pid} is running`);

  const httpServer = http.createServer();

  // setup sticky sessions
  setupMaster(httpServer, {
    loadBalancingMethod: "least-connection",
  });

  // setup connections between the workers
  setupPrimary();

  // needed for packets containing buffers (you can ignore it if you only send plaintext objects)
  // Node.js < 16.0.0
  cluster.setupMaster({
    serialization: "advanced",
  });
  // Node.js > 16.0.0
  // cluster.setupPrimary({
  //   serialization: "advanced",
  // });

  httpServer.listen(3000);

  for (let i = 0; i < numCPUs; i++) {
    cluster.fork();
  }

  cluster.on("exit", (worker) => {
    console.log(`Worker ${worker.process.pid} died`);
    cluster.fork();
  });
} else {
  console.log(`Worker ${process.pid} started`);

  const httpServer = http.createServer();
  const io = new Server(httpServer);

  // use the cluster adapter
  io.adapter(createAdapter());

  // setup connection with the primary process
  setupWorker(io);

  io.on("connection", (socket) => {
    /* ... */
  });
}
在节点之间传递事件
¥Passing events between nodes
现在你有多个接受连接的 Socket.IO 节点,如果你想向所有客户端(或某个 room 中的客户端)广播事件,你将需要某种在进程或计算机之间传递消息的方法。
¥Now that you have multiple Socket.IO nodes accepting connections, if you want to broadcast events to all clients (or to the clients in a certain room) you’ll need some way of passing messages between processes or computers.
负责路由消息的接口就是我们所说的 适配器。
¥The interface in charge of routing messages is what we call the Adapter.