Socket.IO 使用 WebTransport
¥Socket.IO with WebTransport
版本 4.7.0(2023 年 6 月)中添加了对 WebTransport 的支持。
¥Support for WebTransport has been added in version 4.7.0 (June 2023).
简而言之,WebTransport 是 WebSocket 的替代方案,它修复了困扰 队头阻塞 等 WebSocket 的几个性能问题。
¥In short, WebTransport is an alternative to WebSocket which fixes several performance issues that plague WebSockets like head-of-line blocking.
如果你想了解有关此新 Web API 的更多信息,请查看:
¥If you want more information about this new web API, please check:
在本指南中,我们将创建一个接受 WebTransport 连接的 Socket.IO 服务器。
¥In this guide, we will create a Socket.IO server that accepts WebTransport connections.
开始了!
¥Here we go!
要求
¥Requirements
请至少使用 Node.js 18(撰写本文时的 当前 LTS 版本)。
¥Please use at least Node.js 18 (the current LTS version at the time of writing).
SSL 证书
¥SSL certificate
首先,让我们为我们的项目创建一个新目录:
¥First, let's create a new directory for our project:
mkdir webtransport-sample-project && cd webtransport-sample-project
WebTransport 仅在安全上下文 (HTTPS) 中工作,因此我们需要 SSL 证书。
¥WebTransport only works in secure contexts (HTTPS), so we will need an SSL certificate.
你可以运行以下命令来颁发新证书:
¥You can run the following command to issue a new certificate:
openssl req -new -x509 -nodes \
    -out cert.pem \
    -keyout key.pem \
    -newkey ec \
    -pkeyopt ec_paramgen_curve:prime256v1 \
    -subj '/CN=127.0.0.1' \
    -days 14
参考:https://www.openssl.org/docs/man3.1/man1/openssl-req.html
¥Reference: https://www.openssl.org/docs/man3.1/man1/openssl-req.html
这将生成符合 此处 列出的要求的私钥和证书:
¥This will generate a private key and a certificate which comply with the requirements listed here:
有效期的总长度不得超过两周
¥the total length of the validity period MUST NOT exceed two weeks
允许的公钥算法的确切列表 [...] 必须包括带有 secp256r1 (NIST P-256) 命名组的 ECDSA
¥the exact list of allowed public key algorithms [...] MUST include ECDSA with the secp256r1 (NIST P-256) named group
好的,你现在应该有:
¥OK, so you should now have:
.
├── cert.pem
└── key.pem
基本 HTTPS 服务器
¥Basic HTTPS server
然后,让我们创建一个基本的 Node.js HTTPS 服务器:
¥Then, let's create a basic Node.js HTTPS server:
{
  "name": "webtransport-sample-project",
  "version": "0.0.1",
  "description": "Socket.IO with WebTransport",
  "private": true,
  "type": "module"
}
import { readFile } from "node:fs/promises";
import { createServer } from "node:https";

const key = await readFile("./key.pem");
const cert = await readFile("./cert.pem");

const httpsServer = createServer({
  key,
  cert
}, async (req, res) => {
  if (req.method === "GET" && req.url === "/") {
    const content = await readFile("./index.html");
    res.writeHead(200, {
      "content-type": "text/html"
    });
    res.write(content);
    res.end();
  } else {
    res.writeHead(404).end();
  }
});

const port = process.env.PORT || 3000;

httpsServer.listen(port, () => {
  console.log(`server listening at https://localhost:${port}`);
});
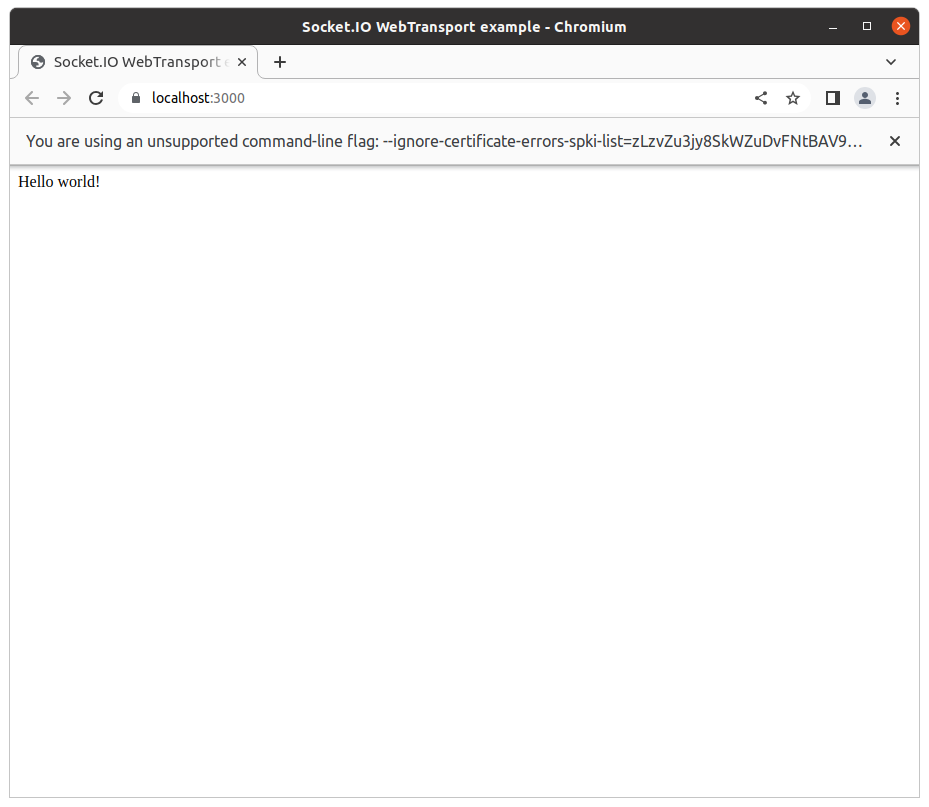
<!doctype html>
<html lang="en">
  <head>
    <meta charset="UTF-8">
    <title>Socket.IO WebTransport example</title>
  </head>
  <body>
    Hello world!
  </body>
</html>
这里没什么特别的,我们只是在 / 处提供 index.html 文件的内容,否则返回 HTTP 404 错误代码。
¥Nothing fancy here, we just serve the content of the index.html file at /, and return an HTTP 404 error code otherwise.
参考:https://nodejs.cn/api/https.html
¥Reference: https://nodejs.cn/api/https.html
你可以通过运行 node index.js 来启动服务器:
¥You can start the server by running node index.js:
$ node index.js
server listening at https://localhost:3000
现在,让我们打开一个新的浏览器窗口:
¥Now, let's open a new browser window:
#!/bin/bash
HASH=`openssl x509 -pubkey -noout -in cert.pem |
    openssl pkey -pubin -outform der |
    openssl dgst -sha256 -binary |
    base64`

chromium \
    --ignore-certificate-errors-spki-list=$HASH \
    https://localhost:3000
--ignore-certificate-errors-spki-list 标志告诉 Chromium 接受我们的自签名证书而不抗诉:
¥The --ignore-certificate-errors-spki-list flag tells Chromium to accept our self-signed certificate without complaining:
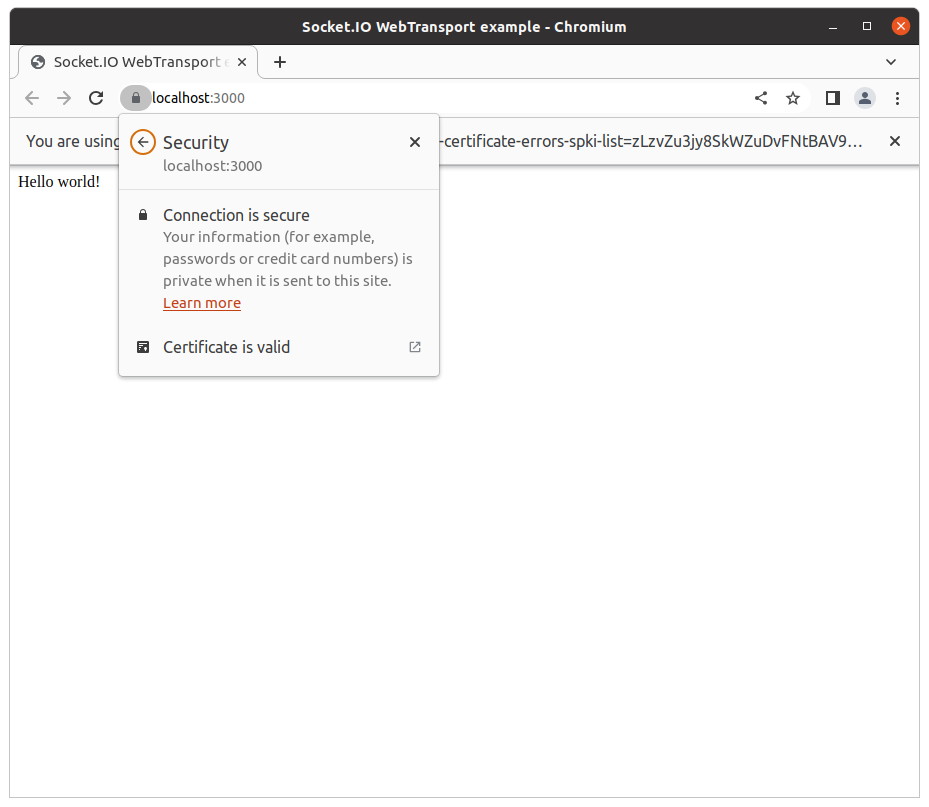
我们的 SSL 证书确实被视为有效:
¥Our SSL certificate is indeed deemed valid:
很棒的!你现在应该拥有:
¥Great! You should now have:
.
├── cert.pem
├── index.html
├── index.js
├── key.pem
├── open_browser.sh
└── package.json
Socket.IO 服务器
¥Socket.IO server
现在,让我们安装 socket.io 软件包:
¥Now, let's install the socket.io package:
npm i socket.io
我们现在创建一个 Socket.IO 服务器并将其附加到我们现有的 HTTPS 服务器:
¥We now create a Socket.IO server and attach it to our existing HTTPS server:
import { readFile } from "node:fs/promises";
import { createServer } from "node:https";
import { Server } from "socket.io";

const key = await readFile("./key.pem");
const cert = await readFile("./cert.pem");

const httpsServer = createServer({
  key,
  cert
}, async (req, res) => {
  if (req.method === "GET" && req.url === "/") {
    const content = await readFile("./index.html");
    res.writeHead(200, {
      "content-type": "text/html"
    });
    res.write(content);
    res.end();
  } else {
    res.writeHead(404).end();
  }
});

const port = process.env.PORT || 3000;

httpsServer.listen(port, () => {
  console.log(`server listening at https://localhost:${port}`);
});

const io = new Server(httpsServer);

io.on("connection", (socket) => {
  console.log(`connected with transport ${socket.conn.transport.name}`);

  socket.conn.on("upgrade", (transport) => {
    console.log(`transport upgraded to ${transport.name}`);
  });

  socket.on("disconnect", (reason) => {
    console.log(`disconnected due to ${reason}`);
  });
});
让我们相应地更新客户端:
¥Let's update the client accordingly:
<!doctype html>
<html lang="en">
  <head>
    <meta charset="UTF-8">
    <title>Socket.IO WebTransport example</title>
  </head>
  <body>
    <p>Status: <span id="status">Disconnected</span></p>
    <p>Transport: <span id="transport">N/A</span></p>

    <script src="/socket.io/socket.io.js"></script>
    <script>
      const $status = document.getElementById("status");
      const $transport = document.getElementById("transport");

      const socket = io();

      socket.on("connect", () => {
        console.log(`connected with transport ${socket.io.engine.transport.name}`);

        $status.innerText = "Connected";
        $transport.innerText = socket.io.engine.transport.name;

        socket.io.engine.on("upgrade", (transport) => {
          console.log(`transport upgraded to ${transport.name}`);

          $transport.innerText = transport.name;
        });
      });

      socket.on("connect_error", (err) => {
        console.log(`connect_error due to ${err.message}`);
      });

      socket.on("disconnect", (reason) => {
        console.log(`disconnect due to ${reason}`);

        $status.innerText = "Disconnected";
        $transport.innerText = "N/A";
      });
    </script>
  </body>
</html>
一些解释:
¥A few explanations:
客户端打包包
¥client bundle
<script src="/socket.io/socket.io.js"></script>
Socket.IO 客户端包由位于 /socket.io/socket.io.js 的服务器提供服务。
¥The Socket.IO client bundle is served by the server at /socket.io/socket.io.js.
我们还可以使用缩小的打包包(/socket.io/socket.io.min.js,没有调试日志)或 CDN(例如 https://cdn.socket.io/4.7.2/socket.io.min.js)。
¥We could also have used the minified bundle (/socket.io/socket.io.min.js, without debug logs) or a CDN (for example https://cdn.socket.io/4.7.2/socket.io.min.js).
运输
¥transport
socket.on("connect", () => {
  console.log(`connected with transport ${socket.io.engine.transport.name}`);
  // ...
});
在 Socket.IO 术语中,传输是一种在客户端和服务器之间建立连接的方法。从 4.7.0 版本开始,现在有 3 种可用的传输:
¥In the Socket.IO jargon, a Transport is a way to establish a connection between a client and a server. Since version 4.7.0, there are now 3 available transports:
HTTP 长轮询
¥HTTP long-polling
默认情况下,Socket.IO 客户端将始终首先尝试 HTTP 长轮询,因为它是最有可能成功建立连接的传输方式。然后它会悄悄升级到性能更高的传输,例如 WebSocket 或 WebTransport。
¥By default, the Socket.IO client will always try HTTP long-polling first, since it is the transport which is the most likely to successfully establish a connection. It will then quietly upgrade to more performant transports, like WebSocket or WebTransport.
有关此升级机制的更多信息 此处。
¥More about this upgrade mechanism here.
好的,让我们重新启动我们的服务器。你现在应该看到:
¥OK, so let's restart our server. You should now see:
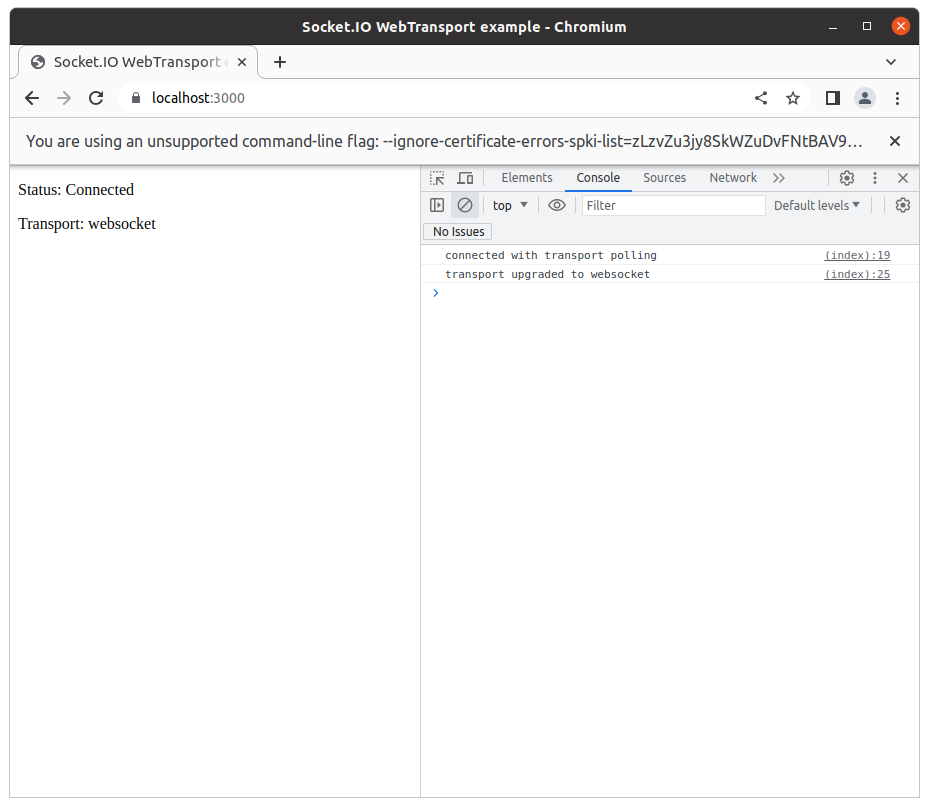
到目前为止,一切都很好。
¥So far, so good.
WebTransport
在客户端,WebTransport 目前可在除 Safari 之外的所有主要浏览器中使用:https://caniuse.com/webtransport
¥On the client side, WebTransport is currently available in all major browsers but Safari: https://caniuse.com/webtransport
在服务器端,在对 WebTransport 的支持登陆 在 Node.js 中(和 在 Deno 中)之前,我们可以使用 Marten Richter 维护的 @fails-components/webtransport 包。
¥On the server side, until support for WebTransport lands in Node.js (and in Deno), we can use the @fails-components/webtransport package maintained by Marten Richter.
npm i @fails-components/webtransport @fails-components/webtransport-transport-http3-quiche
来源:https://github.com/fails-components/webtransport
¥Source: https://github.com/fails-components/webtransport
让我们创建一个 HTTP/3 服务器并将 WebTransport 会话转发到 Socket.IO 服务器:
¥Let's create an HTTP/3 server and forward the WebTransport sessions to the Socket.IO server:
import { readFile } from "node:fs/promises";
import { createServer } from "node:https";
import { Server } from "socket.io";
import { Http3Server } from "@fails-components/webtransport";

const key = await readFile("./key.pem");
const cert = await readFile("./cert.pem");

const httpsServer = createServer({
  key,
  cert
}, async (req, res) => {
  if (req.method === "GET" && req.url === "/") {
    const content = await readFile("./index.html");
    res.writeHead(200, {
      "content-type": "text/html"
    });
    res.write(content);
    res.end();
  } else {
    res.writeHead(404).end();
  }
});

const port = process.env.PORT || 3000;

httpsServer.listen(port, () => {
  console.log(`server listening at https://localhost:${port}`);
});

const io = new Server(httpsServer, {
  transports: ["polling", "websocket", "webtransport"]
});

io.on("connection", (socket) => {
  console.log(`connected with transport ${socket.conn.transport.name}`);

  socket.conn.on("upgrade", (transport) => {
    console.log(`transport upgraded to ${transport.name}`);
  });

  socket.on("disconnect", (reason) => {
    console.log(`disconnected due to ${reason}`);
  });
});

const h3Server = new Http3Server({
  port,
  host: "0.0.0.0",
  secret: "changeit",
  cert,
  privKey: key,
});

h3Server.startServer();

(async () => {
  const stream = await h3Server.sessionStream("/socket.io/");
  const sessionReader = stream.getReader();

  while (true) {
    const { done, value } = await sessionReader.read();
    if (done) {
      break;
    }
    io.engine.onWebTransportSession(value);
  }
})();
这应该已经足够了,但浏览器中仍然出现错误:
¥This should have been sufficient, but there is an error in the browser nonetheless:
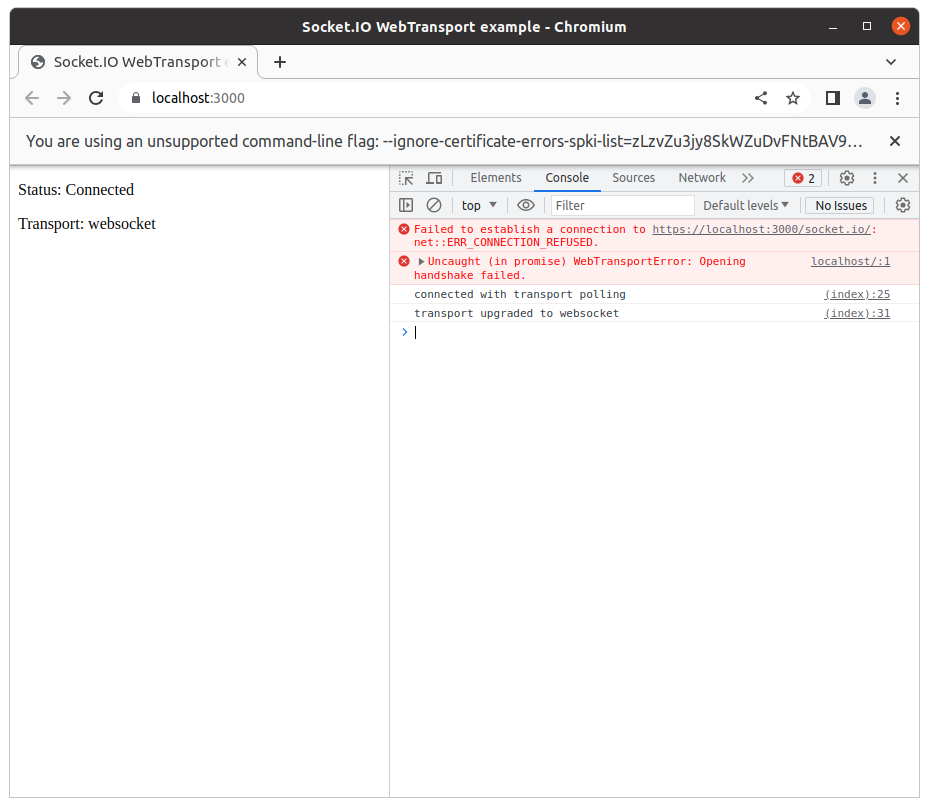
如果有人对此有任何线索,请联系我们。
¥If someone has any clue about this, please ping us.
即使 WebTransport 失败(如果客户端和服务器之间的某些原因阻塞连接也可能发生),也可以使用 WebSocket 成功建立连接。
¥Even if WebTransport fails (which might also happen if something between the client and the server blocks the connection), the connection is successfully established with WebSocket.
一个快速的解决方法是使用 127.0.0.1 而不是 localhost:
¥A quick workaround is to use 127.0.0.1 instead of localhost:
<!doctype html>
<html lang="en">
  <head>
    <meta charset="UTF-8">
    <title>Socket.IO WebTransport example</title>
  </head>
  <body>
    <p>Status: <span id="status">Disconnected</span></p>
    <p>Transport: <span id="transport">N/A</span></p>

    <script src="/socket.io/socket.io.js"></script>
    <script>
      const $status = document.getElementById("status");
      const $transport = document.getElementById("transport");

      const socket = io({
        transportOptions: {
          webtransport: {
            hostname: "127.0.0.1"
          }
        }
      });

      socket.on("connect", () => {
        console.log(`connected with transport ${socket.io.engine.transport.name}`);

        $status.innerText = "Connected";
        $transport.innerText = socket.io.engine.transport.name;

        socket.io.engine.on("upgrade", (transport) => {
          console.log(`transport upgraded to ${transport.name}`);

          $transport.innerText = transport.name;
        });
      });

      socket.on("connect_error", (err) => {
        console.log(`connect_error due to ${err.message}`);
      });

      socket.on("disconnect", (reason) => {
        console.log(`disconnect due to ${reason}`);

        $status.innerText = "Disconnected";
        $transport.innerText = "N/A";
      });
    </script>
  </body>
</html>
#!/bin/bash
HASH=`openssl x509 -pubkey -noout -in cert.pem |
    openssl pkey -pubin -outform der |
    openssl dgst -sha256 -binary |
    base64`

chromium \
    --ignore-certificate-errors-spki-list=$HASH \
    --origin-to-force-quic-on=127.0.0.1:3000 \
    https://localhost:3000
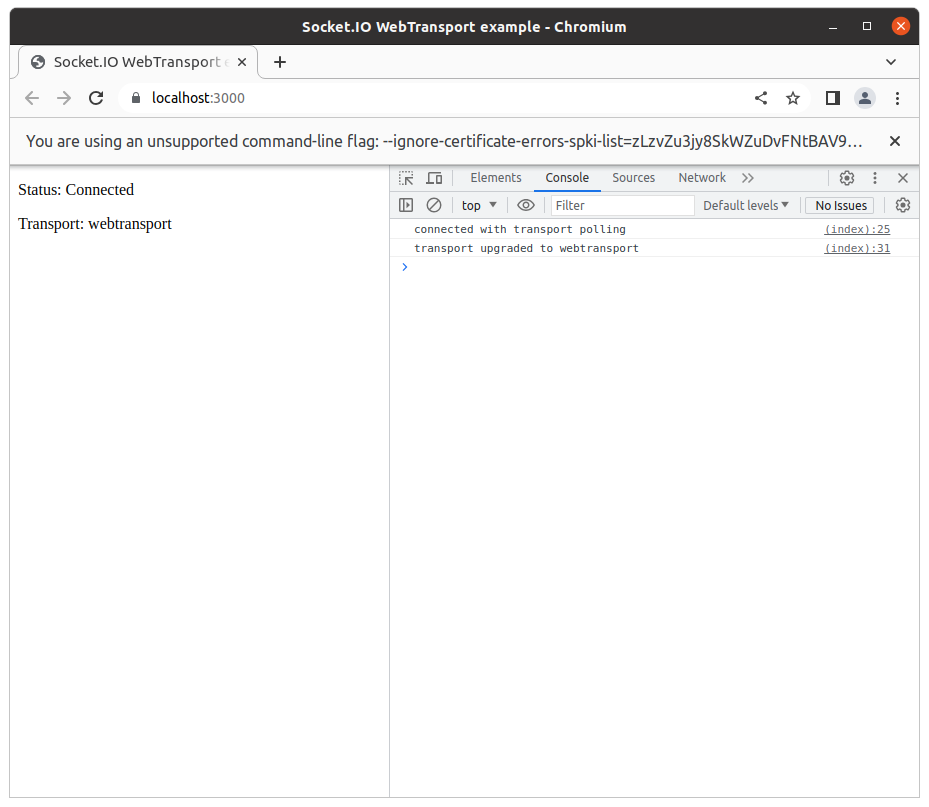
瞧!
¥And voilà!
结论
¥Conclusion
与十多年前的 WebSocket 一样(!),Socket.IO 现在可以让你受益于 WebTransport 带来的性能改进,而无需担心浏览器兼容性。
¥Like WebSocket more than 10 years ago (!), Socket.IO now allows you to benefit from the performance improvements brought by WebTransport, without worrying about browser compatibility.
谢谢阅读!
¥Thanks for reading!