性能调优
以下是提高 Socket.IO 服务器性能的一些技巧:
¥Here are some tips to improve the performance of your Socket.IO server:
你可能还对 扩展到多个节点 感兴趣。
¥You might also be interested in scaling to multiple nodes.
在 Socket.IO 级别
¥At the Socket.IO level
由于在大多数情况下,Socket.IO 连接将通过 WebSocket 建立,因此 Socket.IO 服务器的性能将与底层 WebSocket 服务器的性能密切相关(默认为 ws)。
¥Since, in most cases, the Socket.IO connection will be established with WebSocket, the performance of your Socket.IO server will be strongly linked to the performance of the underlying WebSocket server (ws, by default).
安装 ws 原生附加组件
¥Install ws native add-ons
ws 附带两个可选的二进制附加组件,可改进某些操作。预构建的二进制文件可用于最流行的平台,因此你不一定需要在计算机上安装 C++ 编译器。
¥ws comes with two optional binary add-ons which improve certain operations. Prebuilt binaries are available for the most popular platforms so you don't necessarily need to have a C++ compiler installed on your machine.
bufferutil:允许有效地执行诸如屏蔽和取消屏蔽 WebSocket 帧的数据有效负载等操作。
¥bufferutil: Allows to efficiently perform operations such as masking and unmasking the data payload of the WebSocket frames.
utf-8-validate:允许有效地检查消息是否包含规范所要求的有效 UTF-8。
¥utf-8-validate: Allows to efficiently check if a message contains valid UTF-8 as required by the spec.
要安装这些软件包:
¥To install those packages:
$ npm install --save-optional bufferutil utf-8-validate
请注意,这些包是可选的,如果它们不可用,WebSocket 服务器将回退到 Javascript 实现。更多信息可参见 此处。
¥Please note that these packages are optional, the WebSocket server will fallback to the Javascript implementation if they are not available. More information can be found here.
使用另一个 WebSocket 服务器实现
¥Use another WebSocket server implementation
例如,你可以使用 eiows 包,它是 uws 包(现已弃用)的分支:
¥For example, you can use the eiows package, which is a fork of the (now deprecated) uws package:
$ npm install eiows
然后使用 wsEngine 选项:
¥And then use the wsEngine option:
const { createServer } = require("http");
const { Server } = require("socket.io");

const httpServer = createServer();
const io = new Server(httpServer, {
  wsEngine: require("eiows").Server
});
使用自定义解析器
¥Use a custom parser
如果你通过 Socket.IO 连接发送二进制数据,使用 自定义解析器(例如基于 msgpack 的数据)可能会很有趣,因为默认情况下每个缓冲区都将在其自己的 WebSocket 帧中发送。
¥If you send binary data over the Socket.IO connection, using a custom parser like the one based on msgpack might be interesting, as by default each buffer will be sent in its own WebSocket frame.
用法:
¥Usage:
服务器
¥Server
const { createServer } = require("http");
const { Server } = require("socket.io");
const parser = require("socket.io-msgpack-parser");

const httpServer = createServer();
const io = new Server(httpServer, {
  parser
});
客户端
¥Client
const { io } = require("socket.io-client");
const parser = require("socket.io-msgpack-parser");

const socket = io("https://example.com", {
  parser
});
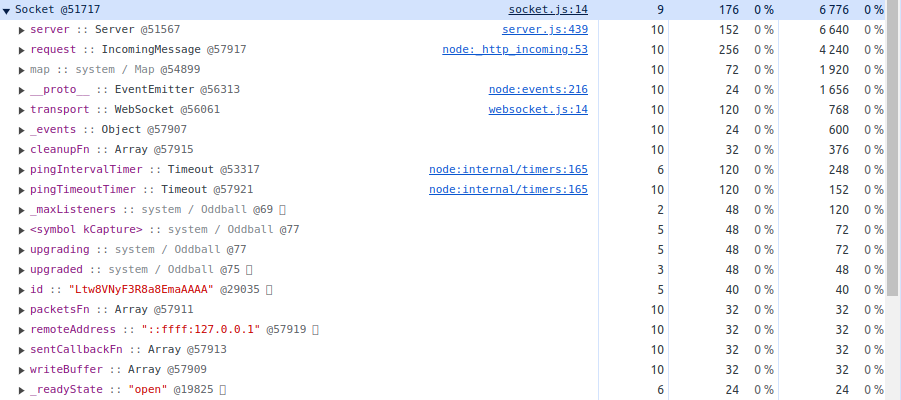
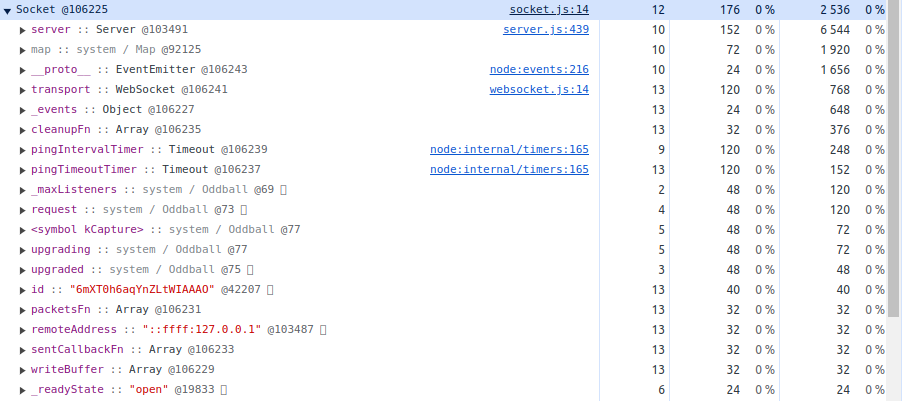
丢弃初始 HTTP 请求
¥Discard the initial HTTP request
默认情况下,每个会话的第一个 HTTP 请求的引用都保存在内存中。例如,在使用 express-session 时需要此引用(请参阅 此处),但可以将其丢弃以节省内存:
¥By default, a reference to the first HTTP request of each session is kept in memory. This reference is needed when working with express-session for example (see here), but can be discarded to save memory:
io.engine.on("connection", (rawSocket) => {
  rawSocket.request = null;
});
前:
¥Before:

后:
¥After:

在操作系统级别
¥At the OS level
有很多关于如何调整操作系统以接受大量连接的好文章。例如,请参见 这个。
¥There are lots of good articles on how to tune your OS to accept a large number of connections. Please see this one for example.
当 负载测试 你的 Socket.IO 服务器时,你可能会遇到以下两个限制:
¥While load testing your Socket.IO server, you will likely reach the two following limits:
最大打开文件数
¥maximum number of open files
如果并发连接数不能超过 1000 个(新客户端无法连接),则很可能已达到打开文件的最大数量:
¥If you can't go over 1000 concurrent connections (new clients are not able to connect), you have most certainly reached the maximum number of open files:
$ ulimit -n
1024
要增加此数字,请创建一个包含以下内容的新文件 /etc/security/limits.d/custom.conf(需要 root 权限):
¥To increase this number, create a new file /etc/security/limits.d/custom.conf with the following content (requires root privileges):
* soft nofile 1048576

* hard nofile 1048576
然后重新加载你的会话。你的新限制现在应该更新:
¥And then reload your session. Your new limit should now be updated:
$ ulimit -n
1048576
最大可用本地端口数
¥maximum number of available local ports
如果并发连接数不能超过 28000 个,那么你肯定已经达到了可用本地端口的最大数量:
¥If you can't go over 28000 concurrent connections, you have most certainly reached the maximum number of available local ports:
$ cat /proc/sys/net/ipv4/ip_local_port_range
32768   60999
要增加此数字,请创建一个包含以下内容的新文件 /etc/sysctl.d/net.ipv4.ip_local_port_range.conf(同样需要 root 权限):
¥To increase this number, create a new file /etc/sysctl.d/net.ipv4.ip_local_port_range.conf with the following content (again, requires root privileges):
net.ipv4.ip_local_port_range = 10000 65535
注意:我们使用 10000 作为下限,因此它不包括计算机上的服务使用的端口(例如 PostgreSQL 服务器的 5432),但你完全可以使用较低的值(低至 1024)。
¥Note: we used 10000 as a lower bound so it does not include the ports that are used by the services on the machine (like 5432 for a PostgreSQL server), but you can totally use a lower value (down to 1024).
重新启动计算机后,你现在将能够愉快地达到 55k 并发连接(每个传入 IP)。
¥Once you reboot your machine, you will now be able to happily go to 55k concurrent connections (per incoming IP).
也可以看看:
¥See also: